The Archipelago
A collaboration with Emi Kodama.

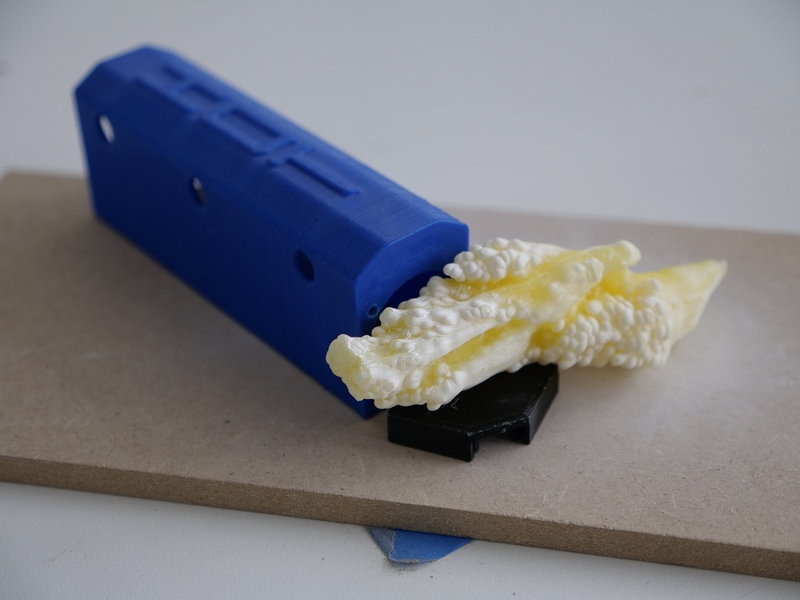
“Like many of us, the island longs to go somewhere warm,” begins the voiceover. When the island heads out on vacation, it leaves behind a doppelganger to preserve the coastal landscape. The objects presented in the installation were found as stowaways in a 3D printer. Excess wax and resin are deposited in a drawer at the bottom of the printer. Molten waste material, solidified and clumped together when cooled, are ancient stalagmites in a high-tech machine. Because they were objects without intent nor a digital source file, they were given both. The surfaces were 3D-scanned and scaled to become immaterial islands in the video.

The image of the island was created for the white surfaces of the objects through the story, and viewers can project their imagination onto it. In contrast to the barren surfaces of the objects, the island in the text is rich in flora and fauna. We borrow Tom Cruise’s charisma to contrast the coolness of the visuals. His familiarity makes the unfamiliar world of the black-and-white objects more accessible. There is a lightness and ubiquity to pop culture, and it opens up the story to a world beyond the island.

This video installation includes objects into a cinematic experience. It tests the various states in which an object can reside. From the physical, across the mental, to the digital. Wax, bytes, a script, and light. From ancient artefact to cutting-edge technological residue. From a fragile original to an indestructible 3D scan. Mechanical strata in a waxen island. And so the objects, in view of each other yet separate, long to travel through appearances and states of matter.

Table of Contents
- Digitizing the objects
- A lightweight rail for linear motion
- Synchronizing events to a video
- Configure OMXPlayer
- Making debugging possible
- Multichannel sound
- Communication between microcontrollers
- Helpful references
Digitizing the objects
3D scanning

Let’s take one of the objects to show the scanning process.
Preparation

The wax like object is quite hard to make a 3D scan of. The scanner is light based and the object disperses the light under the surface, confusing the software. The result of the scan is low on detail and due to the uncertainty of the measurements, there are many holes.
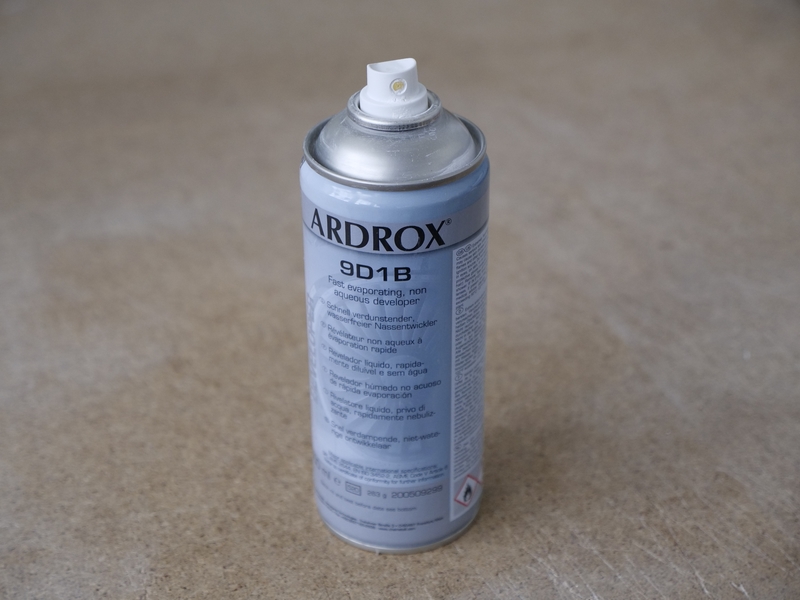
Using a developer spray like Ardrox 9D1B, the object gets a light coating of fine white powder.

This coating makes it clearer for the scanner to see the surface.

A scan of the coated object results in a more detailed and continuous 3D model as a result.
Scanning

All sides of the object are scanned

By aligning the meshes, multiple scans are stitched together.
The object is propped up to expose otherwise hard to reach corners

The last step is to fill remaining holes. This results in a watertight mesh.
Baking the detail to a normal map
See the Formlab wiki for a step by step guide.
A lightweight rail for linear motion
To do: put cad files and assembly instructions online (Wiki)
Synchronizing events to a video
In the video the 3D scanned wax objects are recorded by virtual cameras. To tie the digital and physical versions of the objects together LED lights will illuminate the physical objects at the same time and same position of their digital counterparts. This way the ambiguity of the objects is doubled in the presentation of the video installation.
Setup
This is a technical summary of the test setup demonstrating how to execute events syncrhonized to a video. A Raspberry Pi plays a video and sends out the playback position in milliseconds to an Arduino. The Arduino receives these values and executes events based on specified playback positions. The setup is based on this forum post. OMXPlayer is a command line video player that is built into Raspberry Pi. We only need to install omxplayer-wrapper to control the player though a Python script.
Hardware
- Raspberry Pi 4
- Arduino Due
Schematic
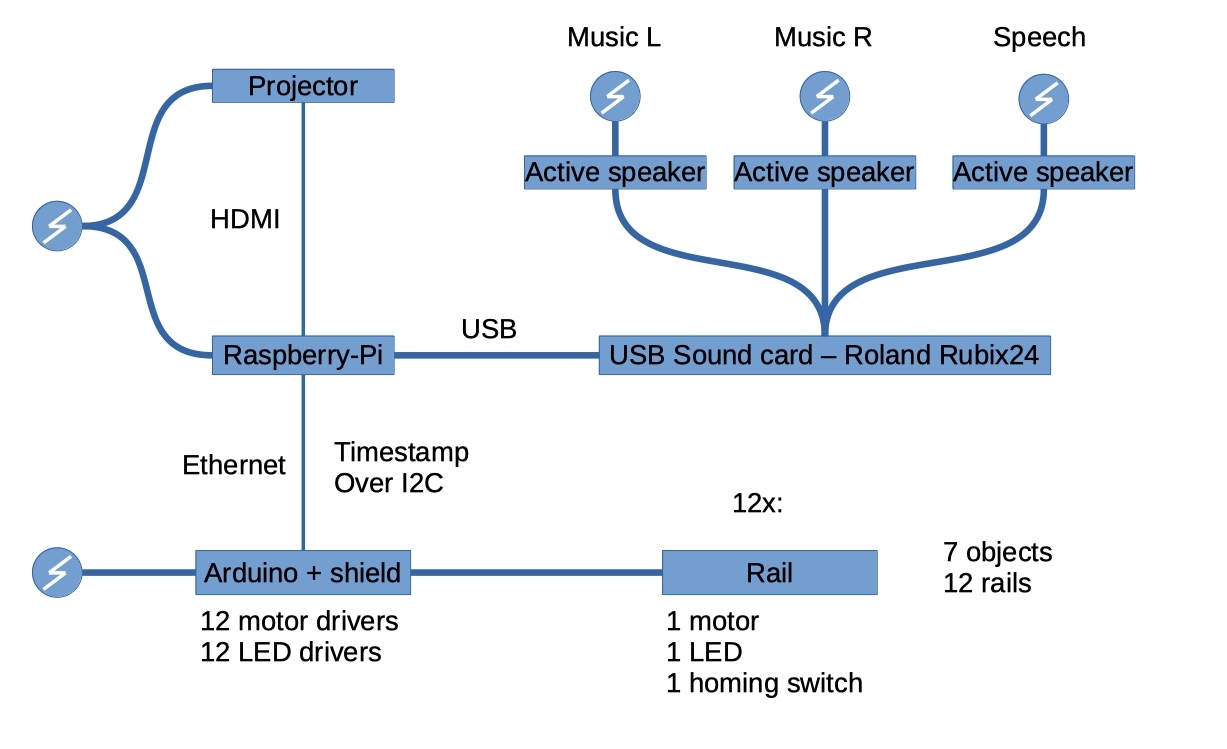
A schematic overview of the current setup.
Software
- Raspberry Pi needs an operating system. I’m using
Raspbian 3.3.1named Buster, and I installed it on the micro SD card with the Raspberry Pi Imager. This is an installer that will format the SD card and use a Noobs (new out of the box software) zip file to install the operating system. - Before installing omxplayer-wrapper, you will need to install some other software packages that omxplayer-wrapper needs. Open the terminal on the raspberry pi and copy-paste the line under OS pre-requisite installation. I had an error executing this:
E: unable to locate package libdbus-1. Based on this issue report, it was suggested to try this line if the default installation didn’t work:sudo apt install -y libdbus-1-3 libdbus-1-dev. - The next step is to install omxplayer-wrapper itself. After trying to run the omxwraper script, I got an error message saying the command couldn’t be found. I think it happened because the Python version in the terminal defaults to Python 2 instead of 3. This means the wrapper was installed fine, but in the Python 2 directory instead of the Python 3 one. The Python editor on the pi uses Python 3 by default, hence it couldn’t find the wrapper. If you use pip3 instead of pip, the wrapper installs the wrapper in the Python 3 environment, so it can be found by the script.
- The Raspberry Pi needs to have the video on it’s system in order to display it. I found a USB stick works best for file transfers to and from the pi.
- I made the following script, and saved it as a .py file on the Raspberry Pi. In the Thonny IDE or Geany IDE, I could press run in order to execute the script. The script can also be ran from the command line after making the file executable:
chmod +x filename.
#!/usr/bin/env python3

# play video and send the milliseconds over serial to Arduino
# based on: https://stackoverflow.com/questions/45532783/fire-events-at-specific-timestamps-during-video-playback from omxplayer import OMXPlayer

import serial.tools.list_ports
from omxplayer import OMXPlayer
from pathlib import Path
from time import sleep
import serial

# automatically find the port name of the Seral connection for Arduino
ports = list(serial.tools.list_ports.comports(include_links=True))
port = ""
for p in ports:
    if "Arduino" in p.description:
        port = p.device
print(port)

# setup the serial connection
rate = 57600
ser = serial.Serial(port,rate)
ser.flushInput()

# Setup the player as shown in omxplayer-wrapper examples :
VIDEO_PATH = Path("tacos.mp4")
player = OMXPlayer(VIDEO_PATH, args=['--no-osd', '--blank']) #'--loop', # for testing, '--loop' has been left out
player.mute # for testing
player.pause()
sleep(3)
player.play()

# Make a query to position() inside infinite loop :
while (1):
    position = player.position() * 1000
    print('%02d' % position) # format as ints and print. This is for debugging

    # send the position to the arduino
    position_encoded = b'%d\n' %position # encode int to bytes + added a newline character
    ser.write(position_encoded)

    if(position >= 133000): #stop at 2 min and 13 seconds. This is the length of the test-video.
        player.quit()

# events are currently handeled in Arduino, but they could also be handled here:
#     /* Event timecodes values are stored in "events" */
#     for event in events.values():
#         if position - 20 <= event['tc'] and position + 20 >= event['tc']:
#             /* Put your code here */

player.quit()
- Connect the two microcontrollers with a USB cable for a test. On the raspberry pi, any usb port works. On the Arduino Due, you’ll need to connect to the programming port. That is the usb port closest to the power input barrel jack. The Arduino will be powered over USB by the raspberry pi. The final version of project will use a Differential I2C Breakout board instead of a USB cable because the two boards won’t be sitting close together.
- Open the video you want to synchronise on your computer, find the frames that you’re interesting in (in this project’s case: all the first frames after a cut in the video) and convert them to milliseconds: in the case of a 25fps movie: (frame * 25) * 1000. Use these values in the array array
positions[]in the following code block. - Upload the following script to the Arduino Due. It receives the time in milliseconds from the Raspberry Pi and executes code based on the predetermined times in the array. Press the erase button on the Arduino 3 seconds prior to uploading the code. You will need to do this every time you upload new code.
/*
Raspberry Pi streams the current position of the video playhead in milliseconds.
Based on predetermined time values, code can be executed in sync with the video.
It is not a perfect sync, but I expect the error to be smaller than a single frame (40 milliseconds in the case of 25fps).
In this example, the built-in LED changes state every time there's a cut in the video.
*/

// Variables for communication
const byte numChars = 32; // max chars to be received
char receivedChars[numChars]; // an array to store the received data
boolean newData = false;
int dataNumber = 0; // chars converted to int

int positions[] = {1560, 43360, 55280, 75320, 80120, 95040, 121640}; // predetermined time-positions in milliseconds
int shot = 0; // use to execute each codeblock only once

void setup() {
  Serial.begin(57600);
  pinMode(13, OUTPUT);
  LED(0);
  delay(2);
}

void loop() {
  recvWithEndMarker();
  convertData();
  syncActions();
}

void recvWithEndMarker() {
  static byte ndx = 0;
  char endMarker = '\n';
  char rc;

  if (Serial.available() > 0) {
    rc = Serial.read();

    if (rc != endMarker) {
      receivedChars[ndx] = rc;
      ndx++;
      if (ndx >= numChars) {
        ndx = numChars - 1;
      }
    }
    else {
      receivedChars[ndx] = '\0'; // terminate the string
      ndx = 0;
      newData = true;
    }
  }
}

void convertData() {
  if (newData == true) {
    dataNumber = 0;
    dataNumber = atoi(receivedChars);   // convert chars into int
    if (dataNumber == 3003) {
      flash(3);
    }
    newData = false;
  }
}

void flash(int n) {
  for (int i = 0; i < n; i++) {
    digitalWrite(13, HIGH);
    delay(30);
    digitalWrite(13, LOW);
    delay(80);
  }
}

void LED(byte n) {
  if (n == 1)
    digitalWrite(13, HIGH);
  else
    digitalWrite(13, LOW);
}

void syncActions () {
  if ((dataNumber > positions[0]) && (shot == 0)) {
    LED(1);
    shot++;
  }
  else if (dataNumber > positions[1]) && (shot == 1)) {
    LED(0);
    shot++;
  }
  else if (dataNumber > (positions[2]) && (shot == 2)) {
    LED(1);
    shot++;
  }
  else if (dataNumber > (positions[3]) && (shot == 3)) {
    LED(0);
    shot++;
  }
  else if (dataNumber > (positions[4]) && (shot == 4)) {
    LED(1);
    shot++;
  }
  else if (dataNumber > (positions[5]) && (shot == 5)) {
    LED(0);
    shot++;
  }
  else if (dataNumber > (positions[6]) && (shot == 6)) {
    LED(1);
    shot++;
  }
}
Configure OMXPlayer
Fullscreen
- OMXPlayer shows the video fullscreen by default
- Exit fullscreen with
ctrl + c. (Typingqas suggested in the manual doesn’t work). - Do not click the mouse after launching OMXPlayer! If you do you will lose focus from the command line and won’t be able to exit fullscreen.
Hide mouse pointer
By default the mouse pointer doesn’t disappear when OMXplayer is fullscreen. Unclutter is a command line utility that hides the cursor x-seconds after the mouse stops moving.
- Install Unclutter:
sudo apt updatesudo apt install unclutter
- unclutter use:
- Type
unclutter -idle 1. When the mouse is 1 second stationary, it will disappear. When the mouse pointer moves, it will reappear. This is a good way to test it and change the value of idle to your liking. Useunclutter -idle 1 &to run the process in the background. - Type
man unclutterfor more details. - To have it enabled at every startup, this command can be put in autostart:
- Navigate to
/etc/xdg/lxsession/LXDE-pi/(this is the autostart location for the root user). - Type
sudo nano autostartto open the autostart file in the Nano text editor. - Add
@unclutter -idle 1 &on the bottom, pressctrl + xand thenY(for Yes) to save. - Reboot to see the effect
- Navigate to
- Type
Sources
Keep the screen on
By default, the video output on the raspberry pi goes black after 10 minutes. To disable:
- Go to
application menu (top left corner) > Preferences > Raspberry Pi Configuration. - In the configuration window, go to
Displayand setScreen Blankingto Disable. - Restart the Raspberry Pi
Sources
Loop the video
Using the builtin --loop command, the playhead position value stopped updating after the first loop. Instead I looped the video manually:
- First I get the full duration of the video:
duration = player.duration() # duration in seconds (float) duration = int(float(duration * 1000)) # convert to milliseconds (int) - Inside the while-loop, we can detect the end of the video, and set the playhead position back at the beginning.
  if position >= (duration - 300): # subtract a few milliseconds of the total duration for stability
player.pause()
sleep(0.3)
player.set_position(1) # set playhead to 1 second into the video
sleep(0.5)
player.play()
Using the time margins (stopping a bit before the end and starting a bit after the beginning) makes the system more stable as it avoids sending invalid position data.
Autostart script
Before enabling a script that runs after a reboot, let’s consider this: what if the script blocks user input and runs indefinitely? That is exactly the case with this project. You won’t be able to disable the autostart settings anymore and you’re essentially locked out of the pi. Let’s create a few ways out of a possible loop as our contingency plan:
- SSH to access the pi from another computer
- An easy way to stop the videoplayer
- Document how to disable and enable the autostart feature
Enable SSH
Let’s enable SSH so we’re able to acces the pi from another computer in the same local network, even when it’s locked in a loop.
- Go to
application menu (top left corner) > Preferences > Raspberry Pi Configuration. - In the configuration window, go to
Interfacesand enableSSH. - Click OK
Connect to the Raspberry pi via SSH
- First we need to have the IP address of the pi. Connect a monitor to the pi, open a terminal window and type
hostname -I. If DHCP changes the ip address, it’s possible to find the address based on the ip lease on the router. Login to the web browser with your credentials and find the pi’s ip address in the list. - On another computer in the same local network, open a terminal window and type
ssh pi@ip_address. If you didn’t customise the password, it will still beraspberry. When you connect through SSH for the first time, you will be prompted to accept the RSA key fingerprint, Type “yes” to continue. Now you can edit the auto startup script and save it. - Close the ssh session by typing ‘exit’
Sources
An easy way to stop the videoplayer
It looks like OMXPlayer has a few odd bugs. One of them is that it doesn’t respond to keystrokes or commands while it is running. The terminal window it was launched from logs the commands you type, but the lines just show text. As they don’t have a command prompt while omxplayer is running, these commands won’t be executed. A workaround is to open a new terminal window that will have keyboard focus while the video is playing. Then it is possible to bind a single key to a terminal command that will stop OMXPlayer from running.
Open a new terminal window
At the top of the python script, add import subprocess.
Somewhere in the same python script add the line subprocess.call('lxterminal'). It can be before or after OMXPlayer has started playing. Lxterminal is the terminal emulator in the graphical user interface of Raspian. This will open a new terminal window that will keep keyboard focus so keyboard commands can still be entered while OMXPlayer is running.
Stop OMXPlayer
When the video plays we could type killall omxplayer.bin + enter to stop omxplayer, but this is tedious. It would be easier to fire this command when pressing a single key.
- We will use
bind '"key":"command"'to connect a certain command to a certain key. - First we need to find the key-code. In a terminal window press
ctrl + vand then the key you want to use. For F12, the commandline shows^[[24~. The ^[ represents ‘esc’, and the rest is the code for the F12 key. - In a terminal window, type
bind '"\e[24~":"killall omxplayer.bin\n pkill -f run.py\n"'and hit enter.- Killall omxplayer stops the video player when it’s running
- pkill -f run.py stops the python script
- The
\nis a newline. This makes the command execute right away. If you hit F12 now, you’ll see that the command to stop OMXPlayer is entered immediately. This only works in this terminal window for now.
- To keep this key bound to the command, add it to the
~/.inputrcfile:- Go to the user directory:
cd ~/ - Type
sudo nano .inputrc. This opens the file in the nano text editor. If the file doesn’t exist yet (as was the case here, nano will create it for you). - Add the following line to the file:
"\e[24~":"killall omxplayer.bin\n"(no single quotes necessary here). Pressxtrl + xand thenyto save and exit. - Reboot.
- Open a new terminal window and hit the key you chose. It should execute the code for you right away.
- Go to the user directory:
Sources
Run a python script after reboot
- Create a folder on the Desktop for the script. I called it autorun.
- Add the script you want to run after reboot to the folder. I renamed mine to run.py.
- Go to the following location:
~/.config/lxsession/LXDE-pi/. - Type
sudo nano autostartto open the file in the nano text editor.- if the file is not yet present, nano will create it for you.
- Sudo is necessary here.
- Add the line
@/home/pi/Desktop/autorun/autorun.sh. This will launch a shell script that will launch the python script. It’s possible to launch the python script directly from the autostart file:@lxterminal -e sudo python3 /home/pi/Desktop/autorun/run.py, but it was unreliable for this project.- The shell script contains this line:
lxterminal -e python3 /home/pi/Desktop/autorun/run.py. - This line sends the command (to launch run.py) to lxterminal. Having the command executed by the terminal means a text window is visible when the script starts, so information on how to stop the script can be shown.
- The python version should match the version shown in the shebang (the first line of the python script that you want to run). In this case it’s Python 3 (python3).
- run.py is the python script we want to use.
- The shell script contains this line:
- Type
ctrl + xand thenyto save.
Regarding this setup I noticed the following behaviour:
- If the autostart file is present, the raspberry pi starts up in the ‘Openbox’ windows manager instead of the graphical Desktop. This is even true when the autostart file is empty. Renaming or moving the file makes the pi boot back into the regular graphical desktop. Rename a file:
mv oldfile newfile. The following script can toggle-rename the file for you. I put it in ~ and launch it with ./script-name.py
  #!/usr/bin/env python3

# toggle autostart by checking if the file 'autostart' exist.
# If so, rename to autostart_disabled to disable autostart

import os

path = "/home/pi/.config/lxsession/LXDE-pi/"

# toggle function
def toggle_autostart():
if  os.path.isfile(path + "autostart_disabled") == True :
os.rename(r'/home/pi/.config/lxsession/LXDE-pi/autostart_disabled',r'/home/pi/.config/lxsession/LXDE-pi/autostart')
print("autostart switched ON")
return

if os.path.isfile(path + "autostart") == True :
os.rename(r'/home/pi/.config/lxsession/LXDE-pi/autostart',r'/home/pi/.config/lxsession/LXDE-pi/autostart_disabled')
print("autostart switched OFF")
return
else:
print("No filename matches found")
return


toggle_autostart()
- Right-click on the background and choose
Terminal emulatorto have access to the pi. This way the autostart script can be renamed to something else to disable it for example. The contextual menu does NOT work when a video is playing in omxplayer.
Stop a python script after reboot
- Launching the script as an argument to lxterminal shows a text window after startup. To my limited knowledge, this is not a full terminal as it doesn’t accept commands, but it shows printed text. I used it to show instructions how to stop the script:
# exit information print("--------------------------------------------") print("Starting video The Archipelago in 60 seconds") print("--------------------------------------------") print("STOP SCRIPT:") print("Right-click outside of this window") print("Select 'Terminal Emulator'") print("In the new window, type: 'pkill -f run.py'") print("The script is stopped and the screen goes black.") print("--------------------------------------------") print("MAKE CHANGES:") print("Right-click outside of this window") print("Select 'Terminal Emulator'") print("rename the autostart file to stop autoloading the script") print("--------------------------------------------") print("~/Desktop/autorun/run.py") print("~/.config/lxsession/LXDE-pi/autostart") print("--------------------------------------------") - I start the script with a delay, so there’s time to stop the script before omxplayer launches:
  # show how much time is left
  for x in range(60, 0, -1):
  	print("{:02d}".format(x), " sec", end='\r')
  	sleep(1)
Sources
Making debugging possible
The raspberry pi will be mounted on the ceiling. When something needs to be corrected, how can I access it?
- ssh
- wireless USB dongle
- ladder
- Disable the loop-option (remove –loop from the omxplayer arguments). This way you can access a terminal emulator when openbox appears (black screen) after the video finishes playing. To do this, click the richt mouse button.
- Always turn off autostart before moving to a new location. Setup the local wifi connection and get the RPI’s IP address (
hostname -I) before enabling it again.
Multichannel sound
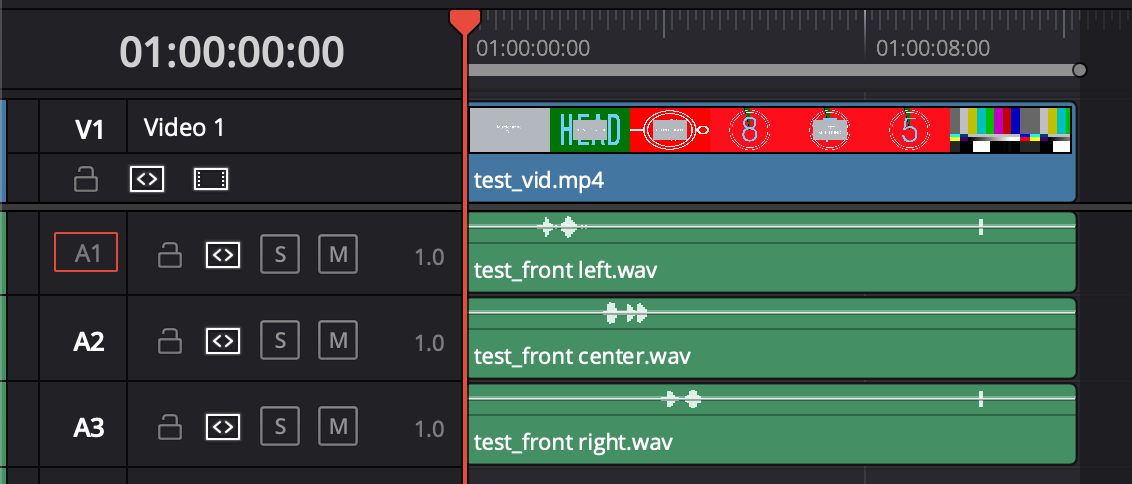
As I want the speakers for the music grouped together with the objects on the stands and the speaker for the voice over together with the projection screen I was looking to get multichannel audio to work on the Raspberry pi.
The Raspberry pi 4 has the ability to send 5.1 surround sound over the HDMI connection. I planned to use an HDMI audio decoder which takes the sound from an HDMI signal and routes it to 6 audio connectors. This never worked as I couldn’t get the pi to output more than 2 audio channels over HDMI. I used a USB sound card instead and this works fine. To make sure the card is compatible, look for ‘class compliant’ devices. This means they are plug & play (don’t require special drivers).
As I need 3 channels, I created a 3-channel bus (LCR) in Davinci Resolve and panned the channels accordingly. Exporting as mp4 h264 AAC (a single 3 channel audio stream) works well with OMXPlayer.
Resolve > Fairlight > Bus Format: set format to LCR

channel 1: pan left
channel 2: pan center
channel 3: pan right

Export format: mp4
Video codec: H.264
Audio Codec: AAC
Output track 1: select the LCR-bus
Setup the speaker layout in OMXplayer:
The --layout 3.0 argument tells omxplayer to process the audio channels as a 3 channel (LCR) setup.
#!/usr/bin/env python3

# minimal test example:

from omxplayer.player import OMXPlayer
from pathlib import Path
from time import sleep

VIDEO_PATH = Path("/home/pi/Documents/surround_test/test8.mp4") # an absolute path is necessary
player = OMXPlayer(VIDEO_PATH, args='--no-osd --blank -o alsa --layout 3.0')

# arguments
# --no-osd: no on screen interface text
# --blank: black background
# -o alsa: use alsa (advanced linux sound architecture) as the audio output (not the built-in audio jack or HDMI)
#    the suggested -o alsa:hw:2,0 doesn't work (where 2,0 is sound card and device number (check wil aplay -l))
# --layout 3.0 set output speaker layout. Supported options: 2.0, 2.1, 3.0, 3.1, 4.0, 4.1, 5.0, 5.1, 7.0, 7.1

sleep(13) # as long as the video duration
player.quit()
Notes on the Roland Rubix24 sound card:
- The channels seem to have been mixed up (output 1: center, output 2: right, output 3: left) but that doesn’t matter much here as I connect the cables myself instead of having a standard with fixed hardware (think cinemas).
- It’s good to know that the volume knob affect channel 1 & 2 but not 3 & 4. To get the level the same on all channels, turn up the volume all the way. This is not documented in the manual.
Communication between microcontrollers
The pi sends a number to the Arduino over i2c. Enable I2C on the pi and connect both controllers to each other.
Test the connection: on the pi: write i2cdetect -y 1.
This output shows a list of the addresses detected on the bus. Here the Arduino is connected to address 8:
     0  1  2  3  4  5  6  7  8  9  a  b  c  d  e  f
00:          -- -- -- -- -- 08 -- -- -- -- -- -- --
10: -- -- -- -- -- -- -- -- -- -- -- -- -- -- -- --
20: -- -- -- -- -- -- -- -- -- -- -- -- -- -- -- --
30: -- -- -- -- -- -- -- -- -- -- -- -- -- -- -- --
40: -- -- -- -- -- -- -- -- -- -- -- -- -- -- -- --
50: -- -- -- -- -- -- -- -- -- -- -- -- -- -- -- --
60: -- -- -- -- -- -- -- -- -- -- -- -- -- -- -- --
70: -- -- -- -- -- -- -- --
Code snippet: Sending a number over I2C
This is an example that sends a six digit number every millisecond from the Raspberry Pi to the Arduino
Python code (run in terminal):
#!/usr/bin/env python3

# Demo: send multi-byte integer from raspberry pi to Arduino over I2C
# The number is turned into an integer array and send in one go over I2C

from smbus2 import SMBus
from time import sleep

exampleNumber = 123476

# send 10 numbers
for i in range(10):
  with SMBus(1) as bus:
    # cast the number to a string and iterate it into an array
    data = [int(i) for i in str(exampleNumber)]

    # send the data on I2C address 8, with an offset of 0
    bus.write_i2c_block_data(8, 0, data)
    sleep(0.01) # wait 1 millisecond
    exampleNumber +=1
Arduino code (open the serial monitor to see the data arrive):
/*
  Demo: send multi-byte integer from Raspberry pi to Arduino over I2C
  The number is broken down into an array of bytes on the raspberry pi and sent over to be reconstructed here.
  Tested with numbers up to 6 digits.

  Setup:
  Raspberry Pi v4 connected via I2C with an Arduino Due

  based on: https://www.aranacorp.com/en/communication-between-raspberry-pi-and-arduino-with-i2c/
*/

# include <Wire.h>
# define I2C_ADDRESS 8 // hexadecimal: 0x8 is decimal 8. This is the first available I2C address

volatile bool I2C_dataReceived = false;
byte I2C_numberOfDigits;
byte I2C_byteBuffer[10] = "";
int NumberFromPi;

void setup()
{
  Wire.begin(I2C_ADDRESS);
  Serial.begin(57600);
  Serial.println("Listening on I2C address 8");
  delay(500);
  Wire.onReceive(receiveEvents); // this function will launch when a communication package arrives
}

void loop() {
  // When a full array has been received, process it
  // and put it in a global integer variable
  if (I2C_dataReceived == true) {

    NumberFromPi = 0; // reset the value to zero

    // add the separate bytes to a single integer
    for (byte i = 0; i < I2C_numberOfDigits; i++) {

      // cast the byte array to int with (int)
      // add one digit a time to the single integer value
      // by multiplying it's value by 10 every time a new one gets added
      NumberFromPi = NumberFromPi * 10 + (int)I2C_byteBuffer[i];
    }

    // Print out the integer
    Serial.print("from pi: ");
    Serial.println(NumberFromPi);

    // reset the flag
    I2C_dataReceived = false;
  }
}


void receiveEvents(int numBytes)
{
  // set the numBytes value to a global variable
  // minus-one because of the unwanted leading zero
  I2C_numberOfDigits = numBytes - 1;

  // dump the first byte since it's a prepended zero we don't want.
  // after every read, the current byte disappears and the next becomes available
  Wire.read();

  // put the incoming bytes in a byte-array
  for (int i = 0; i < numBytes - 1; i++) {
    I2C_byteBuffer[i] = Wire.read();
  }
  I2C_dataReceived = true;
}
Sources:
- Raspberry Pi (master) Arduino (slave) I2C communication with WiringPi.
- A quick intro to I2C
- Sending 16 bit and 32 bit numbers with Arduino I2C
Helpful references
omxplayer-wrapper commands & info
Serial communication